

A GPX file is just a list of coordinates that describes a route or a track. The confusing part isn't the file, it's that "loading a GPX file" means something slightly different depending on whether you're using a dedicated GPS unit, a phone app, or navigating straight from Holloway. Here's each one in plain terms.
Before you start: what you actually have
When you download a GPX file, it'll usually land in your phone or laptop's downloads folder. It's a small text-based file, often just a few kilobytes, so if it's downloaded correctly you'll see it appear almost instantly. Note where it's saved. Every method below starts from knowing that.
Method one: a dedicated GPS unit, such as a Garmin
- Connect the unit to your computer with a USB cable. It should appear as a removable drive, the same way a USB stick would.
- Open the drive and find the folder used for routes or tracks. On most Garmin units this is a folder simply called "GPX" or "Garmin/GPX".
- Copy the GPX file into that folder, exactly as downloaded, no need to rename it.
- Safely eject the device before unplugging it, the same as you would with any USB drive, to avoid corrupting the file transfer.
- On the unit itself, go to the routes or tracks menu and the file should appear in the list, ready to load and navigate.
If your Garmin uses its own app, such as Garmin Explore or Garmin Connect, you can usually import the GPX file through the app instead and let it sync to the device over Wi-Fi or Bluetooth, which skips the cable step entirely.
Method two: a phone with an offline app, such as OsmAnd or Gaia GPS
- Download the GPX file directly on your phone, or transfer it from a computer via email, cloud storage, or a cable.
- Open the file from your downloads or files app, and choose to open it with your navigation app when prompted. On iPhone this usually appears as a "share" or "open in" option.
- Import the track when the app asks. Most apps will add it to a list of saved tracks or routes automatically.
- Download the offline map for the area the route covers, if you haven't already. This is a separate step from importing the GPX file, and it's the one people miss most often.
- Select the route from your saved list and start navigation.
Method three: Navigating directly via Holloway
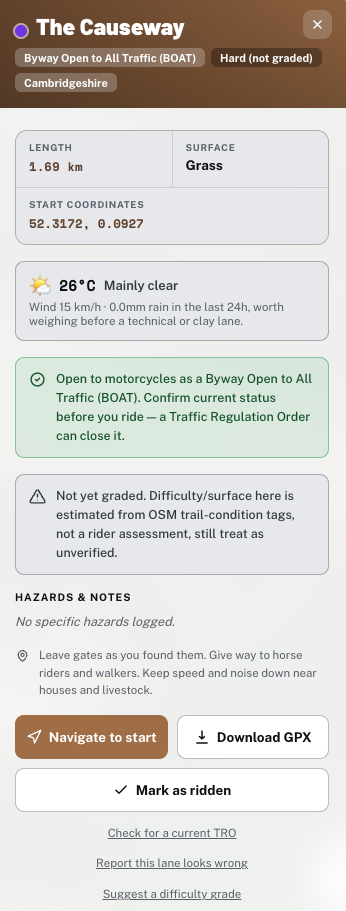
If you've found a lane you want to ride in Holloway, simply click "Navigate to start" and it'll open up Google maps and route you there via the road network. Got to the end of the lane and want to find the next? Simply click the next lane on the map and repeat! Exporting a GPX file is there if you want a backup on a separate device, or if you've created a full multi lane route, but for most riders using Holloway on the day, it isn't a required step.(But at only £20 a year currently, it's not a bad shout!)
Common errors and how to fix them
The route doesn't appear in the list. Usually a file location problem. Double check it landed in the exact folder your GPS unit or app expects, not just anywhere on the device.
The route appears but looks wrong, or is a straight line between two points. This usually means the file only contains a start and end point rather than the full track. Check the export settings on whatever tool you downloaded it from, and re-export as a full track rather than a route or waypoint list if that option exists.
The app can't open the file at all. Some apps are picky about GPX versions or file extensions. Try renaming the file to confirm it ends in ".gpx" and not ".gpx.txt", which happens sometimes when downloading from a browser.
The unit shows the route but won't navigate turn by turn. Dedicated GPS units sometimes distinguish between a "track" (a line to follow) and a "route" (a navigable path with directions). If yours only shows a track, check whether it needs converting to a route within the unit's own software first.
The one thing to check before leaving home
Test whether your setup works with no signal and no Wi-Fi, not just at home on your own network. Plenty of navigation apps quietly rely on an internet connection to pull map tiles or recalculate a route, and green lanes are exactly where you're most likely to lose signal entirely. Put your phone into airplane mode, open the app, and confirm the route and the map both still load. If they don't, you need to download the offline map data before you go, not discover the gap halfway up a lane in the Elan Valley with no bars on your phone.
Getting the route in the first place
Holloway shows every legal green lane in England and Wales for free, including each lane's name, legal type, difficulty, and hazards, so you can plan sensibly even before exporting anything. Full route planning, GPX export, exact coordinates, live weather, and navigate-to-start come with Holloway Premium at £20 a year, which is where most riders will actually build the route this walkthrough gets you loaded onto your bike.
Once your route's loaded and you're comfortable navigating it, the next skill worth building is reading the terrain itself. See the skills that matter more than horsepower on a green lane, and for putting several routes together into a longer trip, multi-day green laning: how to plan a trip that actually works.